Linux energy efficiency, laptops and battery life
While linux distributions proliferate on servers and desktops (and even on mobile devices in the form of Android) linux desktop OSs running on laptops have often been the poor relation. Most prominently, it’s become somewhat accepted that popular fully-featured distributions like Ubuntu and Mint will have significantly higher power consumption, and worse battery life, than Mac OS – or even Windows. Keeping up with Windows running on the same machine is typically considered a good result.
This was much the situation I found for myself when running Linux Mint on my 2015 Macbook Air. The features of Linux Mint are excellent, and I much prefer the interface and flexibility to Mac OS. Indeed, modern distos like Mint are now by necessity generalised for many different systens, which inevitably introduces some degree of unwanted components (or “bloat”).
What I was interested in was whether it was possible to piece together a Linux system more minimally tailored to my needs, and optimised for the MacBook hardware – and so maintain the freedom and flexibility while regaining the battery life performance.
Gentoo is a great candidate here (and was a good opportunity for me to learn about putting together this from scratch). For the unfamiliar, in Gentoo you select and build every component of the operating system, from the kernel upwards. While the direct benefits of self-compilation are probably fairly limited, by controlling every dependency and kernel option you do end up with an extremely stream-lined build.
The basic setup
Power consumption on Linux Mint under light web browsing was reliably >10W. See below for some (more or less) reliable ways to measure power consumption under linux.
I selected the following components to provide a lightweight, but attractive and functional OS:
- Linux kernel 5.15.10
- Gentoo 17.1 profile using
desktop/systemd - LXDE 0.99.2 running on X (no QT or Wayland for performance)
- SLIM desktop manager
-
dunstnotification manager - Synapse quick launcher
While I selected these a la carte for Gentoo, the following optimisations are applicable to many linux distributions (you may need to change Kernel options). One thing to note is that there are no BIOS options on MacBooks – on systems using BIOS rather than UEFI, some of the settings may be more easily accessible through the BIOS.
Following this setup, power usage was down to 7-8W for browsing. Better, but still not particularly good. To get close to the advertised 11 hours+ that Apple claim on a new battery, I would need wattage half of that.
TL; DR
My conclusion, after several fun days of investigation is: that this is entirely possible with a few simple optimisations, without performance loss. The absolutely key thing, which is not enabled by default in the off-the-shelf linux distributions I tried, and which halved my energy consumption is unlocking CPU and package sleep states – specifically allowing the cores to enter C6–C10, the package to enter PC6, and the (integrated) GPU to RC6.
On an MacBook, the key to achieving this is to pass the parameter acpi_osi= to the kernel.
Since it was far from obvious to me both how much power this can save (even more than blunt-instrument measures like dimming the backlight and deactivating hardware) and how to successfully make the configuration, I’ve recorded in detail how I discovered this.
CPU sleep states
In “normal” usage, such as light web browsing, streaming or writing which will nearly never max out the CPU even when clocked-down, the processor is the major consumer of power (apparently more than the backlight).
A detail of modern CPU architecture which I had failed to really appreciate is the sheer number and pervasiveness of energy-saving sleep states. We tend to think of sleep as a state the whole system goes into when it is not in use. But in fact, with core clocks in the hundreds of MHz or GHz, unlesss the CPU is under constant strong demand there will be large portions of time when it has no work to do and is effectively idle.
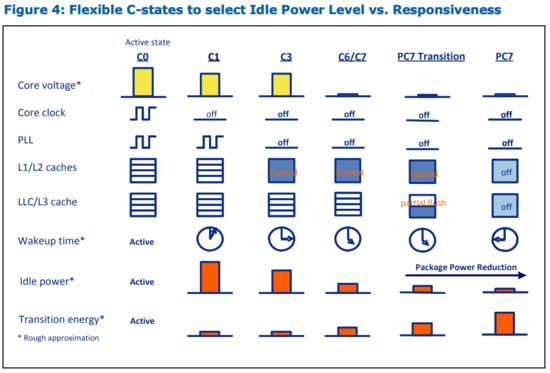
To this end, Intel (and, separately, AMD) have provided capability to gradually de-power parts of the CPU:
- The cores themselves can be powered down (
CStates). From normal operation (C0) the clock can be stopped (C1), the L1/L2 caches flushes (C3) and the core unpowered (C6). Even deeper C-states (C10) are available on Haswell CPUs. - To save even more energy, the whole CPU package can be de-powered. These package core sleep (
PC) states* save a great deal of energy, but are only available if the cores are in deep C-States above.PC6andPC7are most effective, greatly reducing the idle power consumption of the package and flushing the LLC and L3 cache.
(*) In some sources there is confusion between PC states and P states – which save energy by directly reducing the voltage/frequency of the CPU. They are distinct power-saving mechanisms – for clarity I will use PC only.
The GPU also has energy-saving states, but these seem to be less troublesome:
- The GPU’s idle state is called
RC6,RC6pandRC6pp.RC6is important for saving energy but seems to work out the box; the latter deeper states are apparently bug-prone, and offer little improvement, so are deactivated in most linux kernels.
Accessing the energy-efficient states is key to saving power.

Low-hanging fruit
Before diving into C states and the like, there are some simple conventional measures we can take to save some energy:
- Clocking down the CPU appropriately when on battery. A governor can be used to lower the frequency (on my Haswell to a low of 800MHz) when running on battery.
- Preventing turbo boost when running on battery. Turbo tends to dramatically raise the CPU frequency, power consumption and temperature, and so can rapidly drain energy.
- Powering down USB and PCI devices when not in use
- Dimming the backlight and sleeping when not in use (obviously)
- Using lower-power applications. For example, Opera has a power-saving browser mode, and blocking ads will make browsing faster anyway. Certain applications (Thunderbird, I’m looking at you) were permanent power hogs and were sidelined.
Measuring power consumption
To evaluate power saving on your system, you’ll need some way to measure how much power is being drawn and what is using it. There are a number of tools I used in this investigation
-
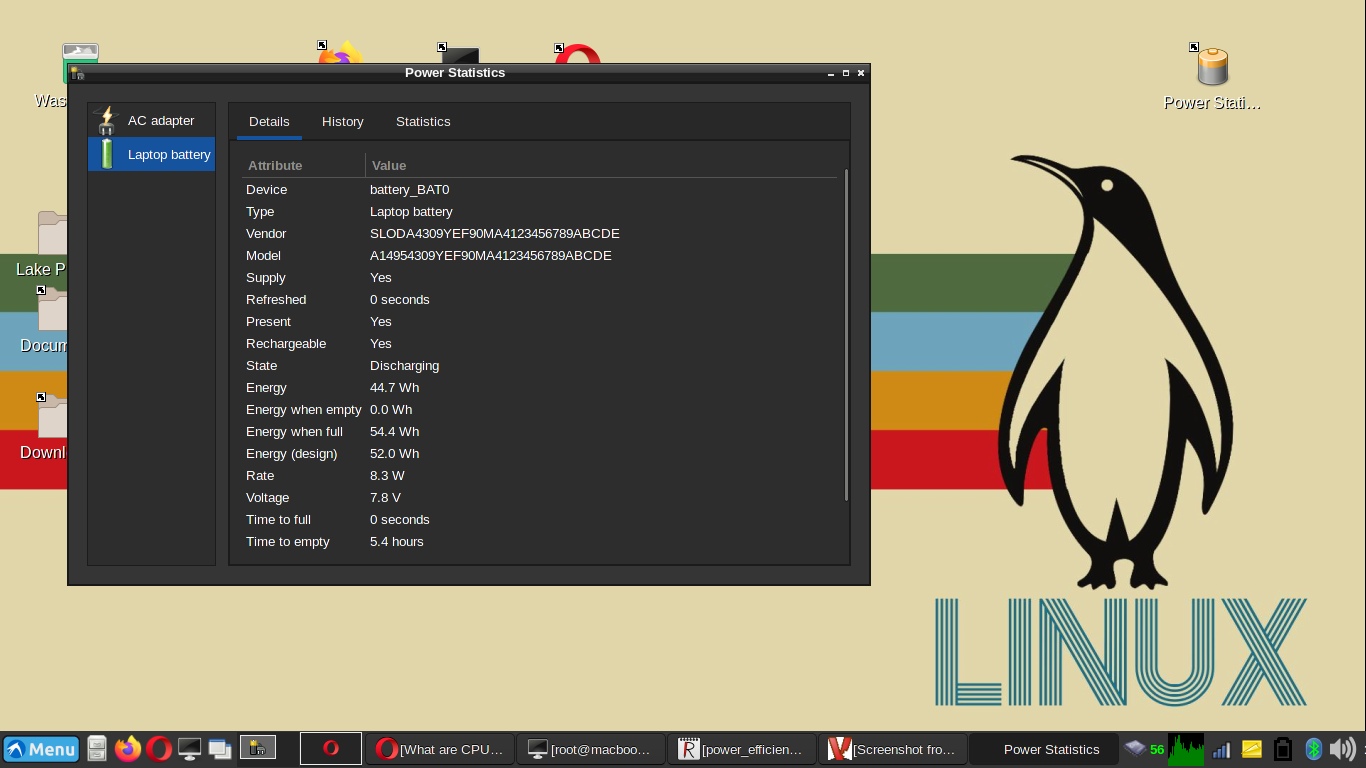
gnome-power-statisticsprovides a good basic GUI for a quick look at power drain. On my system, it did confusingly (and wrongly) report battery total capacity in Wh instead of mAh, so take that with caution. -
Powertop is the most important tool. It generally reports total power drain and Idle (
CandPC) states correctly. Take the power consumption of individual devices with a huge pinch of salt – Powertop tends to simply guess to make up the total power drain reported by the battery, and so will frequently drastically over-report power consumption by e.g. the backlight and wireless adapter (as can be proven by turning them off and power consumption remaining high). -
CpuPower (
sys-power/cpupoweron CoreFreq is a bit more elaborate to set up but gives a wealth of information on CPU activity, interrupts, idle states etc. I needed to build this independently, but the process was straightforward.
Basic power saving – TLP
TLP provides a really nice unified way to make all the basic (“low-hanging fruit”) modifications to save power, and dynamically adjust them to switch between performance when on AC and power save when on battery.
On Gentoo there is a wrinkle here:
- TLP itself is not available in the main portage tree, so you’ll need to add the
tlp-portageoverlay. I used layman for this. - TLPUI is a really useful UI to go through all the (many) settings. It isn’t in any overlay, but is simple to build in Python.
Before using TLP, it’s a good idea to make sure that support for CPU clock (P-state) governors is provided by the kernel. You’ll need
    Default CPUFreq governor (userspace)  --->
    -*-   'performance' governor
    <*>   'powersave' governor
    -*-   'userspace' governor for userspace frequency scaling
    <*>   'ondemand' cpufreq policy governor
    <*>   'conservative' cpufreq governor

    -*- Intel P state control (X86_INTEL_PSTATE)
    <*>   ACPI Processor P-States driver (X86_ACPI_CPUFREQ)
The userspace governor allows the CPU frequency to be controlled from userspace (i.e. TLP). The ondemand/conservative and powersave governors are useful to apply AC and battery power respectively for the CPU_SCALING_GOVERNOR setting in TLP.
Beyond that I activate most of the USB and PCI power saving options available in TLP:
- Audio
SOUND_POWER_SAVE - Disks (default values)
- Network (
WIFI_PWR_ON_BATonly) - PCIe (
PCIE_ASPM_ON_BATto powersupersave) - CPU
-
CPU_SCALING_GOVERNOR_BATto powersave -
CPU_ENERGY_PERF_POLICY_ON_BATto power -
CPI_BOOST_ON_BATturned off -
SCHED_POWERSAVE_ON_BATturned on -
PLATFORM_PROFILE_ON_BATto low-power
-
- Radio – disable bluetooth and wwan on startup
- USB
USB_AUTOSUSPENDon, none excluded
Remember to enable the TLP service
systemctl enable tlp
Activating C-states

On my initial Gentoo installation, I was surprised to see that the CPU cores were not getting any further than the C1 state (this is the lightest sleep state and saves little power – it has been supported since the 486).
Booting into Linux Mint I found that this was activating C states up to C7, so I knew this was possible using the standard kernel on this hardware. A little investigation suggested that the Intel CPU Idle driver is the key to allow the CPU to achieve the deeper sleep states under Linux – it’s important to activate this over the generic ACPI_IDLE driver.
This is easy to activate in the kernel:
[X] Cpuidle Driver for Intel Processors (CONFIG_INTEL_IDLE)
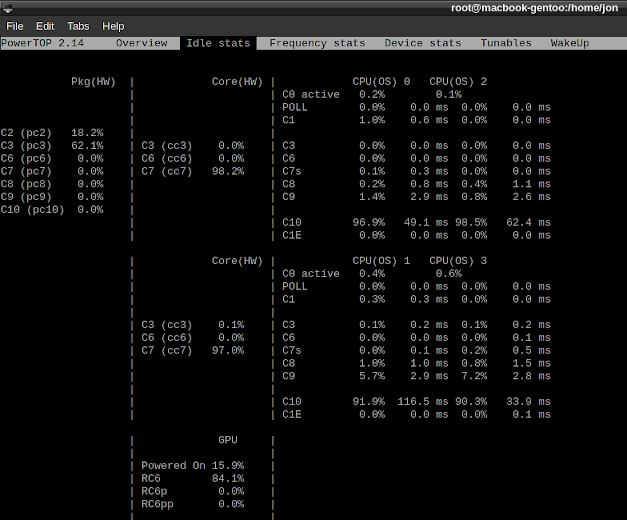
And then deep C-states – on my Haswell up to C10 – immediately start to be used when the processor is anything other than 100% utilization:

Activating deeper Package (PC) states
Deeper core C-states are a nice refinement, but the idle consumption was still about 5-6W. The real benefit of deep C-states is they promote de-powering of the whole CPU package in higher PC-states – and I found this is the real power-saver.
Prior to activating the higher C-states, no depowering of the package was occuring. With C10 active, there was some degree of transition to package sleep, but no deeper than PC3. The strange thing was that deeper PC-states, up to PC10, were shown as supported by powertop, cpupower and CoreFreq, and I could verify that Haswell chips should support these states. With the still high idle power consumption, I became convinced that achieving deeper package sleep states was essential to getting Mac OS-levels of battery life.
Things I tried
There is very little documentation or recorded success with this problem, even though installing Linux on old MacBooks is quite common. So I tried quite a number of approaches before hitting on the (very simple) solution. These did not activate the deeper PC-states themselves – but are probably worth doing anyway for a power-efficient system.
One idea was that too-frequent interrupts were preventing the CPU ever becoming idle enough to enter package sleep (this was based off the Gentoo processor power saving guide). Processor ticks are one thing that can do this, so as recommended there, I ensured that tickless idle was activated. I also reduced the timer frequency to 250Hz down from 1000Hz:
Processor type and features  --->
    [*] Idle dynticks system (tickless idle)
    [*] High Resolution Timer Support
    [*] HPET Timer Support
        Timer frequency (250 HZ)  --->
This appeared to improve PC3 occupancy when idle, but didn’t unlock deeper package states. I saw no incidental latency problems with reducing the timer frequency like this – 100Hz might be a bit low for an interactive system, but 250 seems fine.
I also became convinced that interrupts from PCIe or USB devices were preventing idle, particularly the Thunderbolt connector. Blacklisting these kernel modules (in /etc/modprobe.d/blacklist.conf) is a useful way of deactivating them to save power, but made no difference to the PC-states.
The solution
After much fruitless experimentation and searching, I hit upon this important clue – a kernel bug raised in 2016 by a user on a MacBook and experiencing almost the exact same problem as me (the only difference was they could not get PC3 while I could). They specifically mentioned that this increased their power consumption from around 3.5W to 5W and cut their battery life from “all day”, and appeared to be a regression introduced between kernel version 4.4 and 4.7 – incidentally, when Thunderbolt support was introduced. I was using version 5.10.
This was highly suggestive. But when I read through the issue, it lead to an identified regression in freedesktop. There was a patch to fix it – and some delving into the kernel commits showed that the fix had indeed been committed into main kernel. Digging through my kernel files I verified that (though the source had changed somewhat), the fix still seemed to be in place. So why didn’t it work?
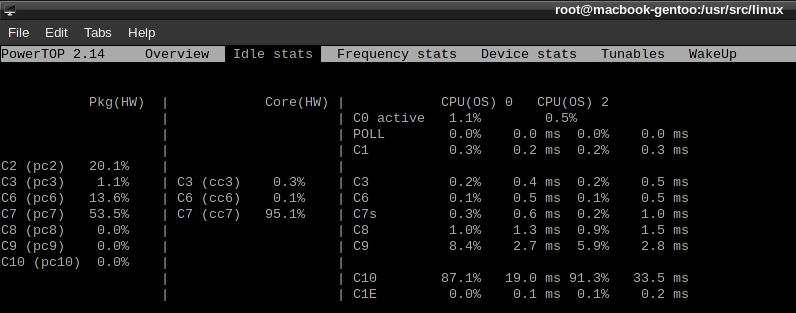
To investigate further, I downloaded and built kernel version 4.4, and used it to boot my Gentoo installation. To my frank amazement, it ran fine – but still no PC states beyond PC3. As a final check, I tried to re-establish exactly the conditions that the user, David Purton, had reported. He indicated (to some confusion of the kernel devs) that he needed to set the kernel parameter acpi_osi to an empty value to see the any benefit. I was sceptical it would make any difference – but – low-and-behold, when I set this at boot, powertop immediately indicated a whole range of package idle states, up to PC7, were being heavily used:

For clarity: the key fix here is to pass acpi_osi= (with no argument) to the kernel upon boot. This can be done by editing your grub configuration like so.

So it’s a kernel v4 regression?
Out of curiosity, I tried later kernel versions, including 4.6 (which David P thought did work) and 4.7 (which he didn’t). They all gave me deep PC states, but only when acpi_osi= was used (and not when acpi_osi=!Darwin was used as some suggested).
What about v5 kernels? My Linux Mint v5.10 installation did not respond to the acpi_osi parameter – but, to my surprise, a clean ubuntu live ISO would activate both deep C and PC-states, but only as long as acpi_osi= was used in boot.
So the fix had been integrated into the kernel code, and it was not an ongoing regression. This was great news, as it means I didn’t have to use an old kernel version to get the power saving benefits – as long as I configured the 5.x kernel correctly it should work.
So why didn’t the magic kernel parameter work on my v5.10 Gentoo and Mint installations?
Watch out for FaceTime
I decided to start from a clean and most recent kernel 5.15. I was pleased to see that when this was used to boot my same Gentoo installation and the acpi_osi= parameter used, the CPU package was easily achieving PC7 states. Success!
So it only remained to find out what it was in the previous build that was preventing deep idle states. I suspected it was some piece of hardware that was providing too many interrupts, and through a (slightly tedious) process of elimination I determined that the Webcam (branded FaceTime) was the culprit. This was a relief as I thought it could be the sound – sound is much more important to me than the webcam, which can be disabled most of the time.
The FaceTime hardware is in fact rather odd, apparently using a separate wifi-disabled Broadcom chip – and getting it working in Linux was a bit of a challenge – see details here. It was evidently suppressing my sleep states, so had to be deactivated by default.
The cleanest way to do this is to blacklist the appropriate kernel modules so they aren’t loaded. I added these lines to /etc/modprobe/blacklist.conf:
blacklist facetimehd
blacklist videobuf2_dma_sg
blacklist videobuf2_memops
blacklist videobuf2_v4l2
blacklist videobuf2_common
The webcam system (facetimehd) uses the Video for Linux 2 (V4L2) videobuf drivers. It’s important to make sure these are compiled as kernel modules rather than integrated. To do this, ensure CONFIG_VIDEO_IPU3_CIO2 is set to modular:
-> Device Drivers
    -> Multimedia support (MEDIA_SUPPORT [=y])
        -> Media drivers
            -> Media PCI Adapters (MEDIA_PCI_SUPPORT [=y])
                <M>   Intel ipu3-cio2 driver
But why?
This whole state of affairs – a dramatic energy saving being unlocked by the blanking of a simple kernel parameter – was very unexpected, certainly to me. What is acpi_osi and why might it break deep package idle states?
So, the function of acpi_osi is very interesting. It is intended to ensure proper ACPI (configuration and power interface) operation on BIOSes which are not properly specified by pretending that Linux is another operating system. By default, that other operating system is Windows. By setting acpi_osi to an empty string, this default is overridden.
So this is very curious. Could it be possible that the Mac hardware cripples an operating system’s use of the ACPI interface, breaking idle states and so greatly reducing battery life, if it thinks that OS is Windows? I have no idea if this is plausible. It seems very strange that blanking this string (not even pretending to be OSX is necessary) restores the proper processor idling.
The Outcome
The outcome of all this is a gratifying reduction in power consumption and concommitant major increase in battery life, with gentoo running on the most up-to-date kernel version 5.15.
Power consumption for light normal usage (web browsing, playing music) with medium backlight is now reliably under 4W, typically 3.2-3.5W. When completely sitting idle it’s more like 2W. This equals a battery life of something like 11 hours (power-statistics reckons 15, but I suspect this is an exaggeration) – a dramatic improvement on the less than 4 hours or so I was getting before.
More aggressive power saving
If that’s not enough tweaking for you, you can go even further, though I haven’t found it to be necessary for normal use.
Note that, though unlikely, the following may permanently damage your hardware. Use with care.
On the Haswell and later intel CPUs it’s fairly straightforward and safe to undervolt the CPU and GPU. There are numerous utilities, but Gentoo actually provides intel-undervolt as a package sys-power/intel-undervolt.
You will need to enable MSR in the kernel, as these are the registers written to when lowering the voltage:
-> Processor type and features
    <*> /dev/cpu/*/msr - Model-specific register support (CONFIG_X86_MSR)
Initial good values are to undervolt the CPU by -50mV and the GPU by -100mV. I found my CPU could tolerate -70mv for a little more saving. The energy savings seemed to be fairly modest though.
Go slowly – if you starve the processor of too much voltage, it may become unstable leading to crashes. A hard reboot should restore the default voltage, however, so the process is relatively safe.
