with microG, F-Droid and Aurora
Don’t Be Evil is now long forgotten. It’s almost a truism that the purpose of Google is to harvest our data so we can be advertised to. But are we stuck with Google on Android?
We all know that Android is a Google project – but things are a bit more complicated than that. Google does not in fact control Android; rather it is an open source, and freely licensed, project worked on by a consortium (and is merely sponsored by Google). In fact, the majority of Android and the applications it runs is built from open source code and tools.
Unfortunately, Google have in practice made it as difficult as they possibly can to use Android without involving the Google ecosystem.
Google have attempted to insert themselves into almost every process in your phone, hoovering up as much data as they can, and claiming everything will break if they are removed.
This isn’t true. Let’s de-Google Android.
Why de-Google?
In my adventures with picking apart just all the places Google touches your phone, I have come to two unfortunate conclusions:
- That enmeshing everything with Google gives the user very little, almost nothing. They have created dependencies purely for Google’s, the advertisers’, and [occasionally] third-party suppliers’ convenience.
- That every time Google is involved, they harvest your data. Absolutely anything that calls out to Google – you can bet they’re keeping that and building up a file.
Here is a short list of the deliberate dependencies Google use to hamstring their operating system:
- By default Google forces users to obtain apps through its walled-off Play Store using a Google account.
- Most Android distributions include Google Mobile Services (GMS). App developers are encouraged to make strong dependencies on this – even though very little of its functionality is required for the Apps to work.
- One thing GMS does do is tracking and data harvesting. Most trackers and “analytics” (i.e. spyware) uses GMS.
- There is yet another level of restrictions on top of this attempting to lock you into Google: SafetyNet, a “tamper resistance” feature.
- The Chrome browser is baked very deeply into the Android OS as the System Webview.
- The vast majority of Android distributions are proprietary, and forcibly include Google software.
(for more details, see Google’s Stranglehold on Android)
The practical upshot of all this is that Google have attempted to insert themselves into almost every process in your phone, hoovering up as much data as they can, and claiming everything will break if they are removed.
This isn’t true. Let’s de-Google Android.
App stores

The first step is to find somewhere to install apps from. While there are many sketchy sites that circulate APKs, I’d generally avoid these because (i) they may genuinely be corrupt and (ii) you then lose any of the update mechanism which you might (at your imperative) want.
While you may just want to invent a new Google account only to access Google’s Play store, in practice you’ll have to leave this logged in on your phone – where it will be tracking everything else you do. Instead, there are two simple options that can get us access to the full range of apps:
- Free and open source apps are available from F-Droid. This is an open app store, with automatic updates (on your schedule) and careful screening of apps (but – unlike by Google – to ensure they don’t contain any trackers). Only a limited range of apps are available here, but in terms of security and privacy they tend to be much better. They are also all free. The only real downside to F-Droid is the search is … well, it’s a bit rubbish. If you can’t find something the first time, try some different search terms and you might be surprised.
- The entire Google Play catalogue can be accessed using Aurora. This uses a set of anonymous Google accounts search and download any apps you want. Other than that it’s actually superior in design and usability than the Google play store. It will keep track of versions and updates, which you can install (or not) at your convenience, and also has an audit of what trackers and other nasties each app contains.
I’ve found these two in combination – as well as APKs used directly from development projects – are more than enough.
One note on using Aurora – you might have to turn Insecure anonymous session on in Settings -> Networking if it isn’t showing you geographically specific apps. Afterwards, log out and back in again anonymously. For example, I don’t see UK-specific banking apps if I don’t turn this on.
Replacing Google Mobile Services
You can go ahead and install apps that claim to require Google Mobile Services (GMS) and the installation should go fine. You may find on running them, however, that they refuse to start, giving some error message about Google services being not found or out of date. Note that the vast majority of apps don’t actually functionally need anything from Google – they have just tied themselves to that ecosystem, likely for tracking purposes.
To solve this problem, we’re going to take advantage of the original open source intentions of Android. Because the interface (API) for the GMS is totally open, there’s nothing to stop open source coders creating a completely free and open version that provides (we say “implements”) the same interface. And this is what microG does. We call this “stubbing out” in the industry.
MicroG provides all everything these apps expect to be able to talk to – and can be made to look identical to Google’s GMS. Where there is substantial functionality (like maps), microG provides it from free sources (like OpenStreetmap instead of Google maps – better anyway). When the “functionality” is actually detrimental to the user, like spying and reporting back on you, microG quietly drops it in the backend and does nothing.
This solution works perfectly – but it does require (i) a rooted phone and (ii) a few steps to get right. Let’s walk through them.
Magisk Modules
We earlier rooted the phone using Magisk, and now we’re going to use modules of Magisk with root mode access to provide microG.
Before we do that, we’re going to install a helper for Magisk modules. This didn’t used to be required (it was built into Magisk), but unfortunately the module database has been moved around and it’s now easier to find them using Fox’s Magisk Module Manager (Fox’s MMM). Download it from F-droid here or you can see the source and releases on github.
Install it, and once it opens grant it superuser (root) rights (a popup should open). We’ll need to do this for a number of applications we want to give root access to – but we should do it sparingly and manually. Fox’s MMM is fine for this. Magisk handles which applications have superuser rights – you can see this on the bottom of the Magisk manager app.
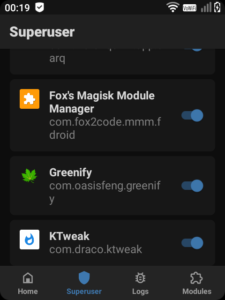
Once installed as superuser, in the MMM settings make sure Magisk Modules Alt Repo is enabled in Settings -> Repos.
There are some modules you might not be able to find in MMM. In that case, they can generally be downloaded as simple .zip files. Download them onto the phone, and then you can install them directly within the Magisk app by going Modules -> Install from Storage.
You’ll need to reboot after installation of any Magisk module (as it patches the bootloader).
Installing microG
You can install microG separately – but this is the quickest and simplest way.
There are a number of different builts of of microG, but the one I am going to use is called microG installer revived from nift4. I installed version 2.6.2-0 directly in Fox’s Magisk Module Manager from the Magisk Modules Alt Repo.
The benefit of this package is it bundles up everything you need for microG and installs it in working configuration. There are several components of microG and otherwise it is easy to get confused. The revived installer includes the core, fake proxy, fake store and open source maps service.
Go ahead and install it – you may then need to reboot your phone. You will likely need to grant microG superuser and lots of other privileges- go ahead (it is open source and safe). It should then show up as an installed module within your Magisk manager app.
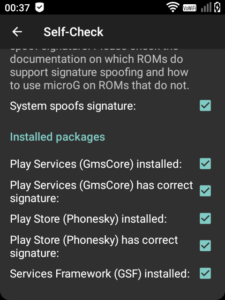
It will also provide you with a microG configuration app. If you run this, you’ll find that the self-test initially fails due to System spoofs signature not being enabled. I’ll explain what this means and how to deal with it next.
Package spoofing with FakeGApps and LSExposed
Package spoofing? Why do I need this?
So – this is Google’s last way of getting their claws into the system. They know that they’ve maneuvered to getting many unrelated apps to depend on their GMS. But they also know that these apps will actually work perfectly if the GMS is “stubbed out”. How can they stop this?
Google signs every package made available through the play store – i.e. all apps, as far as they are concerned – with their certificate. This means that they control what apps can name themselves. This also applies to the GMS services we want to replace. If you try to replace them, then apps that call out to them will see the “wrong” name and show an error message.
So we need to enable our phone to allow us to call packages anything we want – i.e. moving trust from Google to us. While it’s called “spoofing” which sounds like a hacker-ish term, it’s important to remember that this is just us as users taking back control of our own devices from Google. We can do this on our rooted phone.
To do this, we going to install a runtime root modifier called LSposed. The is an updated to the older XPosed system, and runs in much the same way through Magisk’s Zygisk engine.
- Make sure Zygisk is turned on in Magisk (discussed previously)
- Install
Zygisk - LSPosedfrom Fox’s Magisk Module Manager. If you can’t find it there, you can download the release (.zip) directly from github here. Be sure to use the Zygisk rather than Riru (older) version. I installed version 1.8.3. - LSPosed is a Magisk (boot) module, so you’ll need to reboot your phone. Once you do, you should be able to open the LSPosed interface, which gives another place to install modules. This all looks very similar to Magisk, but the technical difference is this: Magisk does boot-level root access, while LSPosed does run-time.
- The next step is to turn on signature spoofing for microG. You can do this really easily by installing the LSPosed module
FakeGapps, available from F-droid here. Once it is installed, it should appear in your LSPosed module list – enable it, and tick to apply it to theSystem Framework(as recommended).
All being well we can now “fake” out Google apps permanently. Run the microG configuration and perform the self-check again – this time you should see a tick beside system spoofing and everything looking happy.
Passing SafetyNet
Phew, that was a lot of hard work just to get Google out our lives right? It was, but well done: you’ll find that many GSM apps now just work.
But there is one more trick that Google have up their sleeve to try to lock you in: SafetyNet. This is supposed to be a tamper-resistant mechanism that checks a device’s hardware and software is “intact”. Naturally Google, and Google’s servers, are the ones that decide what this means. Generally there’s some sort of sketchy security justification, but really: it’s to stop users getting control of their own devices.
Luckily we can also defeat/pass SafetyNet – but there are a couple more steps. Passing the SafetyNet is a good test that you have entirely defeated Google’s checking mechanisms, and that your phone looks to them (and other software) entirely “normal” – with no Google software present at all.
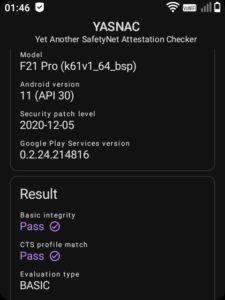
The first thing to do is install a SafetyNet “attestation” checker. A nice simple one is YASNAC (yet another safetynet attestation checker) available on the Play Store (install it using Aurora). If you attempt to run the checker – you will most likely find it fails.
Here’s what we must do to make it pass:
- Install the
Universal SafetyNet FixMagisk module in Fox’s MMM, or as a .zip from github here. I’m using version 2.2.1. You’ll need to reboot your phone as this is another Magisk module. - Then install the
MagiskHide Props Configmodule by Digeridoohan. This will make the device pretend it’s one well understood by Google (you might not need this step if you’re not running the Qin F21). You can download the .zip from github here, or to add it via Fox’s MMM you’ll need to add the Androidacy Modules repo. - We need to configure the
Props Configusing a terminal, but we’ll avoid doing that on the phone since it’s a pain in the arse. Instead, ensure USB debugging is enabled and plug it into a machine with ADB installed. Then start a shell and become root on the phone by runningadb shellsu
You may need to grantcom.android.shellsuperuser rights in Magisk. - Update the system properties to become a Google “certified” device. Run the following:
props1 - Edit device fingerprint (active)f - Pick a certified fingerprint30 - Xiaomi25 - Xiaomi Mi 10 Lite 5G Global (10 & 11)2 - Android version 11
and then selectyto apply the changes and reboot the phone. - We’re going to hide the Magisk app entirely and “denylist” the sensitive apps to make sure Google doesn’t know we’ve defeated them. In the Magisk app settings, select Hide the Magisk App. This will generate a (random) new name and package ID for the Magisk app – but will generate a link so it’s easy to find. Then in Configure Denylist make sure the
microG Service Framework Proxy(com.google.android.gsf) as well as YASNAC is selected. - Finally, we’re going to turn on SafetyNet features from within microG. In the microG configuration app, turn on
Google device registration– note this does not do anything with your device by default, it simply fakes it out. Then turn onAllow device attestationinside Google SafetyNet. - microG now includes its own SafetyNet checker. You can run that from within the microG app – if it passes, you then just need to check it works from within YASNAC.
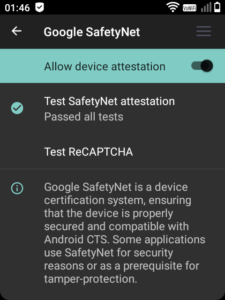
Once SafetyNet passes from within microG and YASNAC, you have completely configured your device to run any app dependent on Google – without having a single piece of Google software running upon it!
Replacing Chrome System Webview
A little discussed area where Google software may be used on your system in the System Webview.
As well as any browser that the user normally uses, a decent number of apps require either an embedded browser function or want a simple way to render web-type content (html, css etc) within the app. Android’s solution to this is the System Webview, a stripped-down but full browser implementation that exists as a library apps can link to. I’ve found the web view is used by all sorts of things including banking apps – and even, in an extreme case, actually does the job of rendering web pages in Opera Mini (there is another very good reason to avoid Opera Mini like the plague, which I’ll return to later).
So you definitely need a system webview installed. The bad news is often the webview is (Google) Chrome. Now that browser may be shared around by all the apps that use it – and it’s very unclear (to me at least) what the security implications of this are. What about shared cookies or sessions?
If you don’t like the idea of this, on a rooted phone it’s possible to replace the default webview with something more trustworthy. This is going a bit further than the steps above – but I’ve included it here for interest.
A curious thing about Chromium (the engine for Google Chrome) is it’s actually open source, and used in many browsers other than Chrome. These steps will switch out our default system webview for non-Google Chromium.
We’re going to use the Webview Manager Magisk module provided by Androidacy. There’s an XDA thread on how it works and you can download the module from their Magisk repository here (their site is a bit clunky so linked for convenience).
By default the Androidacy plugin switches the webview for Bromite (another Chromium derivative with some adblocking unabled). This didn’t work too well for me – but it has options to use vanilla unbranded Chromium. Unfortunately switching isn’t as easy as it could be, as it relies on the use of volume keys (which the Qin F21 doesn’t have!). So I made a little hack to change the default with key intervention:
- Download the
Webview ManagerMagisk module .zip from Androidacy - If you wish to default to Chromium rather than Bromite
- Unizip locally
- Add the following lines to
common/install.shbeforeif ! $KEYCHECK_FAIL && ! $USED_CONFIG;(line 44):WEBVIEW=3BROWSER=0
- Zip back up
- Copy to phone, and install directly in the Magisk manager. Reboot the phone.
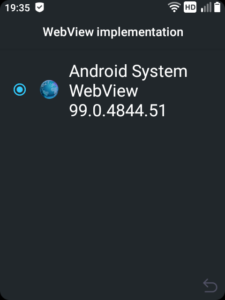
- Following installation, you should be able to go to Developer Settings -> WebView implementation. NB that the implementation will still be called
Android System WebView– but the version number will be updated to the latest Chromium stable (mine is 99.0.4844.51).
